26.5.11

smellin' delicious


i'm super sorry for the lack of posts. life kind of caught up to me and blogging was one of the last things that was on my mind. i went to wal-mart a few days back to pick up some snacks and found myself in the bead/string aisle. with me, you can tell it's summer when my bracelets are stacked up my arms. i bought a ball of hemp twine to make some new bracelets and keep me going all summer. i've already started making them. the one on my right wrist is super cute. i've actually gotten lots of compliments on it.


and more recently, i went to bath and body works. today they had a deal where everything in the store was 20 percent off and their signiture line and collections were buy 3, get 2 free. so of course, i capitalized on that. this was just one of my favourite things that i bought. it's a body spray called dancing waters and my goodness does it smell nice. i will post more photos tomorrow after i'm able to get outside and take them in some sunshine. the weather has been super rainy and i hate taking photos in my house, the lighting is horrible.

once again, sorry for the lack of updating. hopefully this post is a little filler until tomorrow.
22.5.11
i feel like such a nut for not posting like i should be, once this weekend is over, i'll be back to normal :)
20.5.11

computer virus


sorry for the lack of posts. i came down with a sinus infection sunday night and have really been trying to kick it. today was the first day this week i've been able to leave the house. eesh. well my weekend was pretty calm. on sunday, i drove to a floral showcase to take some pictures of flowers. it was a horribly rainy day and everything was wet, but personally, i love the way raindrops look on flowers.


there were a few large magnolia trees outside of the greenhouse that were just screaming my name. i hate how all of the leaves had already fallen off and there were few left. there were some of the one's that were somewhat in tact.


when i finally ventured inside the showcase, i was greeted with a warm tropical heat. there were so many tropical plants that i had never seen before. this little yellow one caught my eye. i can't quite remember the name but it was definitely unique. i love flowers and probably could have spent hours in this exhibit just looking at all of the different flowers from all over the world.


i finally got the opportunity to pull out my surfboard/skimboard wax and things. i love the way sex wax smells. it has this super pungent coconut smell. one thing i don't let phase me when it comes to surfing/skimboarding, is the fact that i don't live anywhere near an ocean.

edit: i really do apologize for the lack of posts. my computer came down with a virus and they had to wipe everything. thank goodness i still have all my pictures, videos and documents. and i'm glad blogger has an autosave mode, i really didn't feel like writing this all out again!
16.5.11

what's your skin type?

 i'm pretty sure that i'm the queen of combination skin. sometimes my skin is super dry and sometimes it's super oily. over the past few years i've put together a pretty solid collection of products that (i know from experience) work well together. 


if you have oily and/or acne prone skin: 
  • lush's ocean salt is great to clear up some of those unwanted pimples. it also has salt in it which is a drying agent and will make your skin less oily. be careful to not over use it though, or your skin might become irritated.
  • lush's cupcake face mask is a thick, chocolate scented mud mask that you can apply all over your face or just on those problem areas. it decreases pimple size and even says on the carton "great for teenage skin". teenage skin being the skin you associate with the teen years; oily and acne prone. 
  • arbonne makeup primer has acne fighting ingredients in it. put this on before you put on your makeup. it will help to absorb excess oils and keep you shine free. 
  • mac studio fix is one product that i always keep in my purse. if you're feeling oily, simply pull this out and use the applicator provided to blot your skin until the oil has disappeared.
  • rimmel hide the blemish concealer i find myself turning to on those days when nothing seems to be hiding a pimple. it's great because it's in a stick and is super easy to blend. it also won't run you a large amount of money. 
  • almay clear complexion makeup is specially formulated for oily skin. it contains salicylic acid which will help fight acne while you wear it. it's the one foundation that doesn't make my skin oily while i'm wearing it.

if you have dry skin:
  • maybelline mineral power powder foundation is my go-to coverup for those super dry days. i know it sounds strange. "why use a powder foundation for dry skin? why not liquid?" well, i find that when i use a normal liquid foundation, the dry skin is even more noticeable. when the foundation goes on wet it is fine, but as it begins to dry, the dry skin becomes more noticeable. whereas with this powder foundation, it's already dry and i don't have to worry about my skin becoming even more dry. i'd recommend that you try this method.
  • almay line smoothing makeup really quenches your skin's thirst. on dry days, i'll use this around my eye area. it smooths those lines and moisturizes the dry spots. i however, wouldn't use this on my whole face. 
  • last but not least, my favourite product. spectro's hydra care lotion for dry skin. every day i put this on my face underneath my makeup, focusing on the really dry spots. if you have dry skin, this will be the product to help you get rid of it. it really does work and is specially made for your face. if you end up buying one product out of the ones i've mentioned today, make sure that it is this one!
14.5.11

stay soft


countless times people have grabbed my hands and told me "your hands are so soft, how do you do it?" and i tell them, "i moisturize". it really is something that i believe in. there are so many different types of moisturizers out there and it is impossible that you won't find one that you love. 

someone recently asked me what kind of products i use to keep my skin nice and soft:
  • vaseline cocoa butter deep conditioning lotion: i mostly use this gem on my hands, neck and elbows. this isn't the typical vaseline. it has such a nice scent and is made with cocoa butter. i'd recommend this to someone who has really extreme dry skin. the vaseline will soften you up. my skin literally drinks this stuff up.
  • the body shop brazil nut body butter: my most recent body butter buy, and potentially my new favourite. i've never used anything brazil nut before, but i've heard excellent things about them. the lady at the store told me that this was for those pesky areas that always get dry. i find myself using it on my knees, elbows, behind my knees. i also use this on my lower back and thighs. one thing i usually find with body butter is that it leaves you feeling greasy. this one definitely didn't leave me with that feeling. just make sure you let your skin soak it up before you do anything. it doesn't take long, a few minutes.
  • i love coconut & cream and i love strawberries & milkshake: they're supposed to be body butters but i see them as more like body whips. the product is a lovely whipped lotion with a smell that is to die for. i find myself sometimes drooling over the coconut & cream one. i use these all over my body, mostly my legs, arms and torso. along with putting this on before i go to bed, i usually use it in the morning before i go out. the smell is so strong and delicious you can skip the perfume.
  • the body shop coconut shimmer body lotion: not really a shimmer, i felt like ke$ha after i put this on. a great daytime lotion. i don't recommend this for your hands. if you're going out, try putting some on your arms, legs and your neck area. it will leave you smelling nice, looking shimmery and feeling soft.
the last product included in the image above is by calgon. it's my favourite body spray and is from the hawaiian ginger line. it's my go to light scent. i keep it in my locker, gym bag and purse and don't go anywhere without it.

13.5.11

review: sally hansen's jade jump


i bought this polish a little while back and i think i posted a photo of it before. well, i finally decided to wear it. after a week and a half of using a product by sally hansen that makes your nails grow longer and your cuticles much nicer, i finally am satisfied with the way my finger nails are looking. i think my cuticles look so much better than they did before! 

currently, my nails are painted jade jump from the sally hansen spring 2011 collection. you can find this colour at your local drugstore for around 5$. the colour is a minty green that has hints of blue. it could be comparable to the colour of tropical waters near the shoreline.
the colour took me away to a tropical place. it kind of seems out of place for a spring collection. now that i see it on my nails, i feel like i should be in the tropics.

the one thing i love about sally hansen's insta-dri polish is the brush size. it is a fairly wide brush which makes applying the polish mess free. with one stroke, your nail is virtually all covered.

another bonus to this polish is it's fast drying time. it takes literally a minute for the polish to set. i like to be careful and wait a bit longer than that. just in case something isn't dry yet.

the polish has a fairly good wear time. it lasted me a week and only had minor chips. one thing however, is this colour does turn your nails yellow. i removed it and noticed that my nails were tinted a bit. this can be easily fixed by applying a base coat before using the colour.


for a 5$ drugstore polish i can say that i'm very happy with this purchase. i've always been a fan of sally hansen products and think this is just another one of their great polishes. so what are you waiting for? go out and buy it!

cherry blossoms, chocolate fix and peaceful places


what was i doing while blogspot was down for 20 hours? weeping? actually, i was eating away my sorrows with these delicious treats. the magnum double caramel ice cream bars. they were 7.19$ for a package of 3. a little bit on the pricey side but, after all, these are "luxury" ice cream bars. needless to say, i got a little nervous when i noticed that one of my posts was missing. all that was going through my mind was "really? i have to write that all over again!"


on thursday, i found myself at a virtually untouched dock area that i found. there was no one there and it was super quiet. i wish i had brought a lawn chair and had set up camp. nothing sounds better than sitting lakeside with a good book and a tall glass of iced tea. i was even tempted to just sit and fish. i'm such an outdoorsy girl. i can't wait until camping season. nothing appeals to me more than fishing all day then going back to the tent and sleeping on the rock hard ground.


all of the trees are in bloom, so that also added to the beauty of my drive. i'm planning on going to the botanical gardens this weekend to take some more shots of the gorgeous spring flowers. cherry blossoms are by far my favourite. their scent isn't really that strong but they look amazing. there was a tree in my front yard and my camera was practically begging me to take photos.


speaking of taking photos, i've been getting loads of questions on how i shoot my flower photos (and photos in general). here are a few of my tips and tricks that i live by:
  • always shoot in natural light. it is your best friend. whenever you have to use the flash, the quality of the photo decreases. unless you have a lot of equipment to decrease the glare and things, you should really try to shoot in natural lighting.
  • pick a time to take your pictures and always take them during that time. for me, it's around 1-2 in the afternoon when the sun is nice and high. 
  • if you aren't sure what you're doing, don't mess around with the settings on your camera. take a basic photo in no flash mode (or preferably, macro mode if you have the option) then edit it using a photo editing program.
  • always edit your photos. rarely, will you have a stunning photo that comes straight out of camera. even if it's just upping the contrast or adding a little sharpness here and there. it makes a world of difference. 
  • lastly, try using actions if you have photoshop. they are downloadable colouring things. all you have to do is push a button and watch as the action plays out and colours your image. you can find them on deviantart or just by googleing "photoshop actions".
11.5.11

they call me the "tea lady"


it's the truth: all of my friends have dubbed me the "tea lady". i'm an avid collector and i like to think of myself as a tea connoisseur. queen elizabeth, you can invite me over anyday. my addiction started around a year ago when i first discovered the canadian tea store teaopia. they sell loose leaf teas from all over the world. i think i own about half of their stock. 


a recent tea i picked up is called "organic simply mango". it wasn't cheap, totaling out to 14$ for 0.050 kg's. it was worth every penny though. it has an amazing mango peachy flavour to it and tastes amazing over ice. i've never really collected much, the occasional hockey card, a few collectible magazines. i'm proud to say that i am a tea lady. now if only i could buy those cath kidston tins to store it all in.
10.5.11

birthday cake pops


i decided to try and tackle bakeralla.com's cake pop recipe. i changed up a few things and hoped that they would work. the original recipe was for red velvet, and i used white. also my grocery store didn't have the proper chocolate for dipping so i bought white chocolate chips instead. let me tell you now, if you do decide to try this recipe, do not use chocolate chips. you will need:
  • whatever flavour of boxed cake mix you like
  • vegetable oil, eggs and water/milk (ingredients for the cake mix)
  • one can of cream cheese frosting
  • candy wafers (i used chocolate chips, don't use them)

firstly, follow all the instructions on the cake mix box. bake your cake and let it cool entirely. when cool, crumble the cake into a large bowl. make sure they are fine crumbles like what you (mostly) see above. once this is done, add the whole can of icing and mix well. use your hands, you can't be afraid to get a little dirty. mix until you can successfully roll the cake mix into a ball. 


roll the mixture into little balls. you should be able to make around 40 cake balls. set them out on a tray. the tray doesn't need to be greased or anything and it doesn't matter how far apart they are. put them in the fridge for the entire night, or if you're like me and super impatient, a few hours. to speed this process up, try placing them in the freezer. 


this is where i went wrong. do not use chocolate chips to coat your cake balls. the chocolate is too thick and is not dippable. also, do not try to add things to the chocolate to make it more wet. this will just stop the chocolate from hardening. roll the balls in the coating. what i did, since i was unable to roll, was used a knife and spread the chocolate. let the coating harden and add sprinkles if you like.

they taste delicious, they just don't really look all the greatest. this was my first time making them and the way i see it is that for next time, i know what i did wrong and how to fix it. if you do decide to make these, store them in an air lock container; fridge or not, doesn't matter.
9.5.11

may: happy things


my happy things for the month of may:
  • starbucks half price frappucino days - between the hours of 3 and 6 (maybe 5, can't remember) you get your frap. half price. needless to say, you can find me at my neighborhood starbucks every day, from 3 to 6.
  • bright lights and fresh colours - i'd kill to have a balcony like that one up there. my newest obsession is bright bedrooms. i plan on re-doing mine over the summer. i'll definitely be investing in a better light, more candles and some sort of potted plant. maybe 10 potted plants. 
  • fields of tulips - i'm dying to visit keukenhof, holland for the amazing tulips they have. i just want to run through there and pick them. i'd kill to be a florist in the netherlands. 
  • munich - it's not really my home, but i consider it my home, away from home. i felt like a local when i was there. i plan on going back in the near future. i can't hold out any longer.

homemade lip scrub, round two


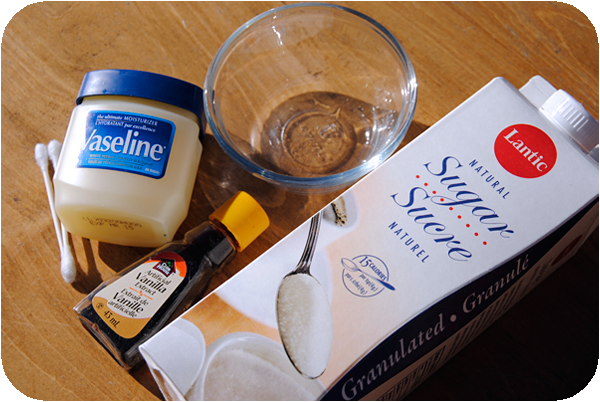
after the success of the scrub that i made yesterday (the recipe was posted for you this morning), i decided to give another recipe for a lip scrub a shot. this time, the base was vaseline. once again, white sugar was used instead of brown. the original recipe doesn't call for vanilla, but i added literally a drop for some smell and flavour. 

first, pour some white granulated sugar into a little bowl (or jar). if you wish, you can always use brown sugar. there are no rules that say that you can't. there also isn't a specific amount of sugar you should use. however much scrub you wish to make is based on however much sugar you use.


next up, add some vaseline into the mix. i used a q-tip and just dipped it in, swirled it around and then mixed it in with the sugar. mix it really well using a spoon, or if you're feeling adventurous, your fingers. when the scrub is mixed well, add a drop of vanilla. you can skip the vanilla if you want. 
* note: if you do add vanilla, add some more sugar along with it. the vanilla is a liquid therefore it will make it watery.


voila. this is what the finished product looked like (without the vanilla). scrub onto your lips and feel the smoothness within seconds. i live by these now.

homemade lip scrub

there are loads of great lip scrubs on the market. this is one that i just whipped up in my kitchen. the difference here is, i chose to use a white sugar as opposed to the classic brown sugar. i found that this still made my lips super soft, but was less abrasive. so, if you want to try a lighter (and tastier) lip scrub, give this one a go. 


the two main ingreidents you will need are a white sugar and cocoa powder. firstly, you're going to want to take however much sugar you plan on using and adding it into a little bowl. the amount of sugar you use really does depend on the amount of scrub you plan on making. then, take a pinch of cocoa powder and mix it in. the finished dry mixture should be a light brown shade.


next up is the glue that holds everything together: oil. i used olive, you can use coconut, almond, jojoba or whatever you prefer. just add a drop, then mix. keep doing this until you get a good consistency. i usually stop when i can form the sugar into a good sized ball and when the mixture stays on my lips and doesn't fall all over the place.


the finished product should look similar to the image above. the mixture should be able to almost stand on it's own. put some on your finger (or a toothbrush) and scrub your lips really well. when you're done, you can wash it off, or lick it off if you like! your lips should feel smooth and free from all dry skin. there are alot of alternatives to the oil that you can use. if you don't have olive, or don't like olive, i'd recommend trying coconut or almond oil. you should be able to find both at your grocery store.

i thoroughly enjoyed this lip scrub. not just because of it's fantastic taste but also because it only took me around five minutes to make. if your lips are in need of a little pick me up, try this!
8.5.11

cheap and chic: h&m purse


on a recent shopping trip, i spotted this bag by h&m in a giant metal bin by the checkout. i was shocked to the price reading only ten dollars. i'm pretty sure i actually asked the lady if it was a mistake. the bag was regularly 40$. practically a steal.


it's a really solid size and has alot of room on the inside. my bag has to be able to hold a big camera and this one works perfectly. another thing i tend to look for in a bag is a pocket on the inside to hold my cell phone. nothing angers me more than putting my phone in my bag and a) having to dig for it and b) pulling it out and seeing it all scuffed and scratched. i purchased a bag like this one from forever21 a while back and two days after i bought it, the lining on the inside ripped. the bag was double the price and horrible quality. i'm so glad i found this one. it's amazing what you can find at h&m if you just look.
6.5.11

going gaga


i think i'm starting to become seriously addicted to starbucks caramel frappucinos. the salted caramel that they drizzle overtop of the whipped cream is to die for. for those of you who are avid starbucks fans, they are currently doing a promotion where between 3 and 5 (maybe 6, don't remember) you can go in and order one of their frappucinos (from a specific menu) and get it for half off. what a deal.


i needed my may magazine fix so i stopped and picked up harper's bazaar and vogue. i wanted the vogue issue because i heard they had a great piece on alexander mcqueen and reese looked stunning on the cover. the bazaar issue was super as well. the gaga article was amazing. even though i was slightly weirded out over her statement about her cheek bones: 
“[T]hey’re not prosthetics,” she tells Derek Blasberg. “They’re my bones. They’ve always been inside of me, but I have been waiting for the right time to reveal to the universe who I truly am. They come out when I’m inspired.”

the photographs were beautiful nevertheless and the dress she was wearing in one was to die for. it's a great interview. if you're a gaga fan go buy the magazine or check out the interview on the web. 


since i can never manage to leave shoppers drug mart without buying some sort of makeup product, i bought this little boots number seven eyeshadow. it's called magnolia and is a sheer pale pink colour. it's a bit sparkly and i loved the way it made my eyes look. it was on sale for 4$ (regularly 8$ or something like that?). i've never tried boots products and i'm thoroughly impressed with the quality of the shadow. it was nicely pigmented and applied evenly.


and lastly, they had my favourite balea masks on sale. this time i decided to try the cooling and calming aloe vera and mint face mask and the grapefruit foot soak. i used a little bit of the calming face mask and found that it burned so bad. after a while, the pain subsided and a nice cooling effect took over. when i rinsed it off, my face was nice and smooth and definitely looked calmer (less red, pores smaller etc.). one thing i did find was that when i awoke this morning, there was some dryness around my mouth. it could just be from my dry bedroom. 

hope you all had a marvelous day. i'm looking forward to the weekend. i bought my mom a really great gift this year for mothers day (at least, i think so)!
5.5.11

belted shirtdresses

polish roundup


i never really used to wear nail polish until a few years ago. i always found it such a hassle to put on and take off. all of a sudden, i went crazy and just started buying and wearing all these different polishes. now i find it quite amusing to match the colour of my nails to my outfit. this is just a quick list of my nine (i know, it's not ten) favourite shades.


from left to right:
  • sally hansen "hard as nails" - disco ball - clear polish with glitter
  • essie polish - merino cool - purple and gray shade
  • sally hansen "hard as nails" - lacey lilac - light purple 
  • sally hansen "insta-dri" - jade jump - light green
  • hard candy "just nails" - clear matte - gives any polish a matte finish
  • opi - black shatter - gives any polish a shatter effect
  • sally hansen "salon manicure" - cafe au lait - sheer, creamy light brown
  • essie - sew psyched - khaki green
  • sally hansen "insta-dri" - blue streak - bright, deep blue

review: stila fabulous in fiji


i've been putting off writing this review for a really long time. and by really long, i mean i bought this around february. the stila fabulous in fiji palette comes with 4 eye shadows and 1 convertible colour that can be used on either your cheeks or your lips. there is also a small mirror on the inside. i purchased it at shoppers drug mart for 13$, but now you can find this palette online at sephora under the stila section for 10$. it is now an online only product and is a limited edition. so if you like it, snatch it up before it's gone!


excuse the messy container, i had just put swatches on my arm prior to taking this photo and forgot to brush of the excess. the convertible lip and cheek colour was nicely coloured, but didn't go on like i expected. the package says it's more of a cheek colour, but personally, i'd skip putting it on your cheeks and use it as a simple lipgloss. it tends to make your skin a bit greasy and doesn't last as long as i'd hoped. you really need to use alot to get a good colour.

as for the shadows. the colours were not at all what i expected. i mean, it's great pigmented shadow but when am i ever going to wear that shade of blue and green? i only use the right side of the palette. the soft shimmery blue and the sheer silver. the blue and green are a bit too costume makeup-esque for my liking. application for all four colours was wonderful. they covered my lid easily and were nice and smooth. 


as for the swatches, to get that shade of plumeria (the far left), i did apply a fair bit. it was really streaky and just didn't look good. this is why i believe you should stick to using it for your lips. escape is by far my favourite. it's a simple sparkly shade with a hint of blue. as you can see, they all went on really nicely. 


rating wise, i'd give it a 6.5 out of 10. the colours weren't my type and the cheek/lip colour really brought the palette down. it applies nicely and the colours are very fiji like. this would be a perfect sized palette to keep in your purse for touch-ups throughout the day. the mirror on the inside is a pretty solid size and the palette itself is compact enough to fit in even a small clutch.

if you're a fan of bright colours, by all means go out and purchase this palette. the colours will be wonderful for you. however, if you like more neutral, toned down and natural shades, skip this one. try some of stila's other palettes: make an impression in moscow and the palette from the garden bliss collection.
4.5.11

review: lush ocean salt


recently, i picked up one of lush's best selling face and body products, ocean salt. i couldn't help myself when i saw it on the shelf, i needed to try it. 

i use a good sized amount - usually i take my index finger and scoop some up. they should tell you at the store that when you first use it, be sure to stir the container well. the ingredients aren't mixed when you get it.

the first time you use it, it will burn. especially if you have a pimple, some sort of cut or a patch of skin that has some sort of abrasion on it. the reason for the burning is most likely the fact that there is real vodka and citrus in the product. i have eczema in certain areas on my body (specifically the elbows and shoulder area). i did try to use the ocean salt on the patches where i have eczema and it burned like i've never felt a burn before. but the result was quite nice, soft skin and surprisingly the redness of the eczema went down.

the product is pure salt. i use it twice a week, sometimes only once since it is so abrasive. i also take extra care in making sure that i don't scrub the product into my skin too hard. be careful to close your mouth when you rinse it off, it doesn't have a pleasant taste. 


 notable ingredients:
  • citrus (grapefruit and lime): think of it as the earth's natural toner. this is what works to fight those pesky pimples. it's also what will make your face sting when you apply the product to your face.
  • vodka: same as the fruit. it's a great pimple fighter, astringent and will help tighten your pores. 
  • coconut: coconuts contain vitamin e which is a great moisturizer. this would be the ingredient that leaves your face feeling super soft after you use ocean salt. 
  • avocado: contains more potassium than a banana which results in the deep penetration of the product. also is loaded with vitamin a, b, d and e. 
lush ocean salt isn't cheap. it will cost you a fair bit of money. $18.95 for 120/g or $30.95 for 250/g. i'd recommend buying the smaller tub first so you can check to see how your skin reacts and if you like it.

rating wise, i'd give lush's ocean salt an 8 out of 10. it really does work wonders. so run, don't walk, to you nearest lush store and pick up this awesome skin saver. you won't be disappointed!

3.5.11

a pop of colour


get the look: the duchess of cambridge


the duchess of cambridge, kate middleton, is my absolute favourite style icon. she has so many great looks. i especially love how she can go from a super dressy look to the cute laid back look - like the one above. i've found a picture of one of my favourite outfits that i've seen her in. i've put together a little collage of items that you could purchase to "get the look" that kate middleton has. one item that the duchess is wearing that isn't included is the watch she is wearing. you could pair this look with a simple gold watch. kate is definitely a style icon!

afternoon walk


i can't believe it's already may. it seems like this year has just flown by so far. just a few weeks ago we were in the middle of a snowstorm! there are so many simple things lying around outside. i sometimes just talk a way and take pictures of all of the little things that i see and love. this tiny daffodil that wasn't quite in full bloom was staring me right in the face. who knew you could find such beauty in your garden? 


happiness can be found even in the darkest of times, when one only remembers to turn on the light.


i'd love to know what these little flowers are called. they're so cute and dainty! i'm pretty sure they spread like wildfire though, because the patch where they were planted was massive. well, just short post for now. i hope you all had a terrific tuesday. and i hope your wednesday's are wonderful!

Related Posts Plugin for WordPress, Blogger...
 

blog template by bloggercandy / heavily edited by simplyhayley